
How to Paint “My Language My Pride – Odia”: A Step-by-Step Odisha Culture Painting Guide
 A language is more than a set of words we use to talk. It holds the lullabies we heard as babies, the stories our grandparents told, the books we studied and the festivals we celebrate. When we say “mo bhasha”, we are really saying “this is where I come from.”
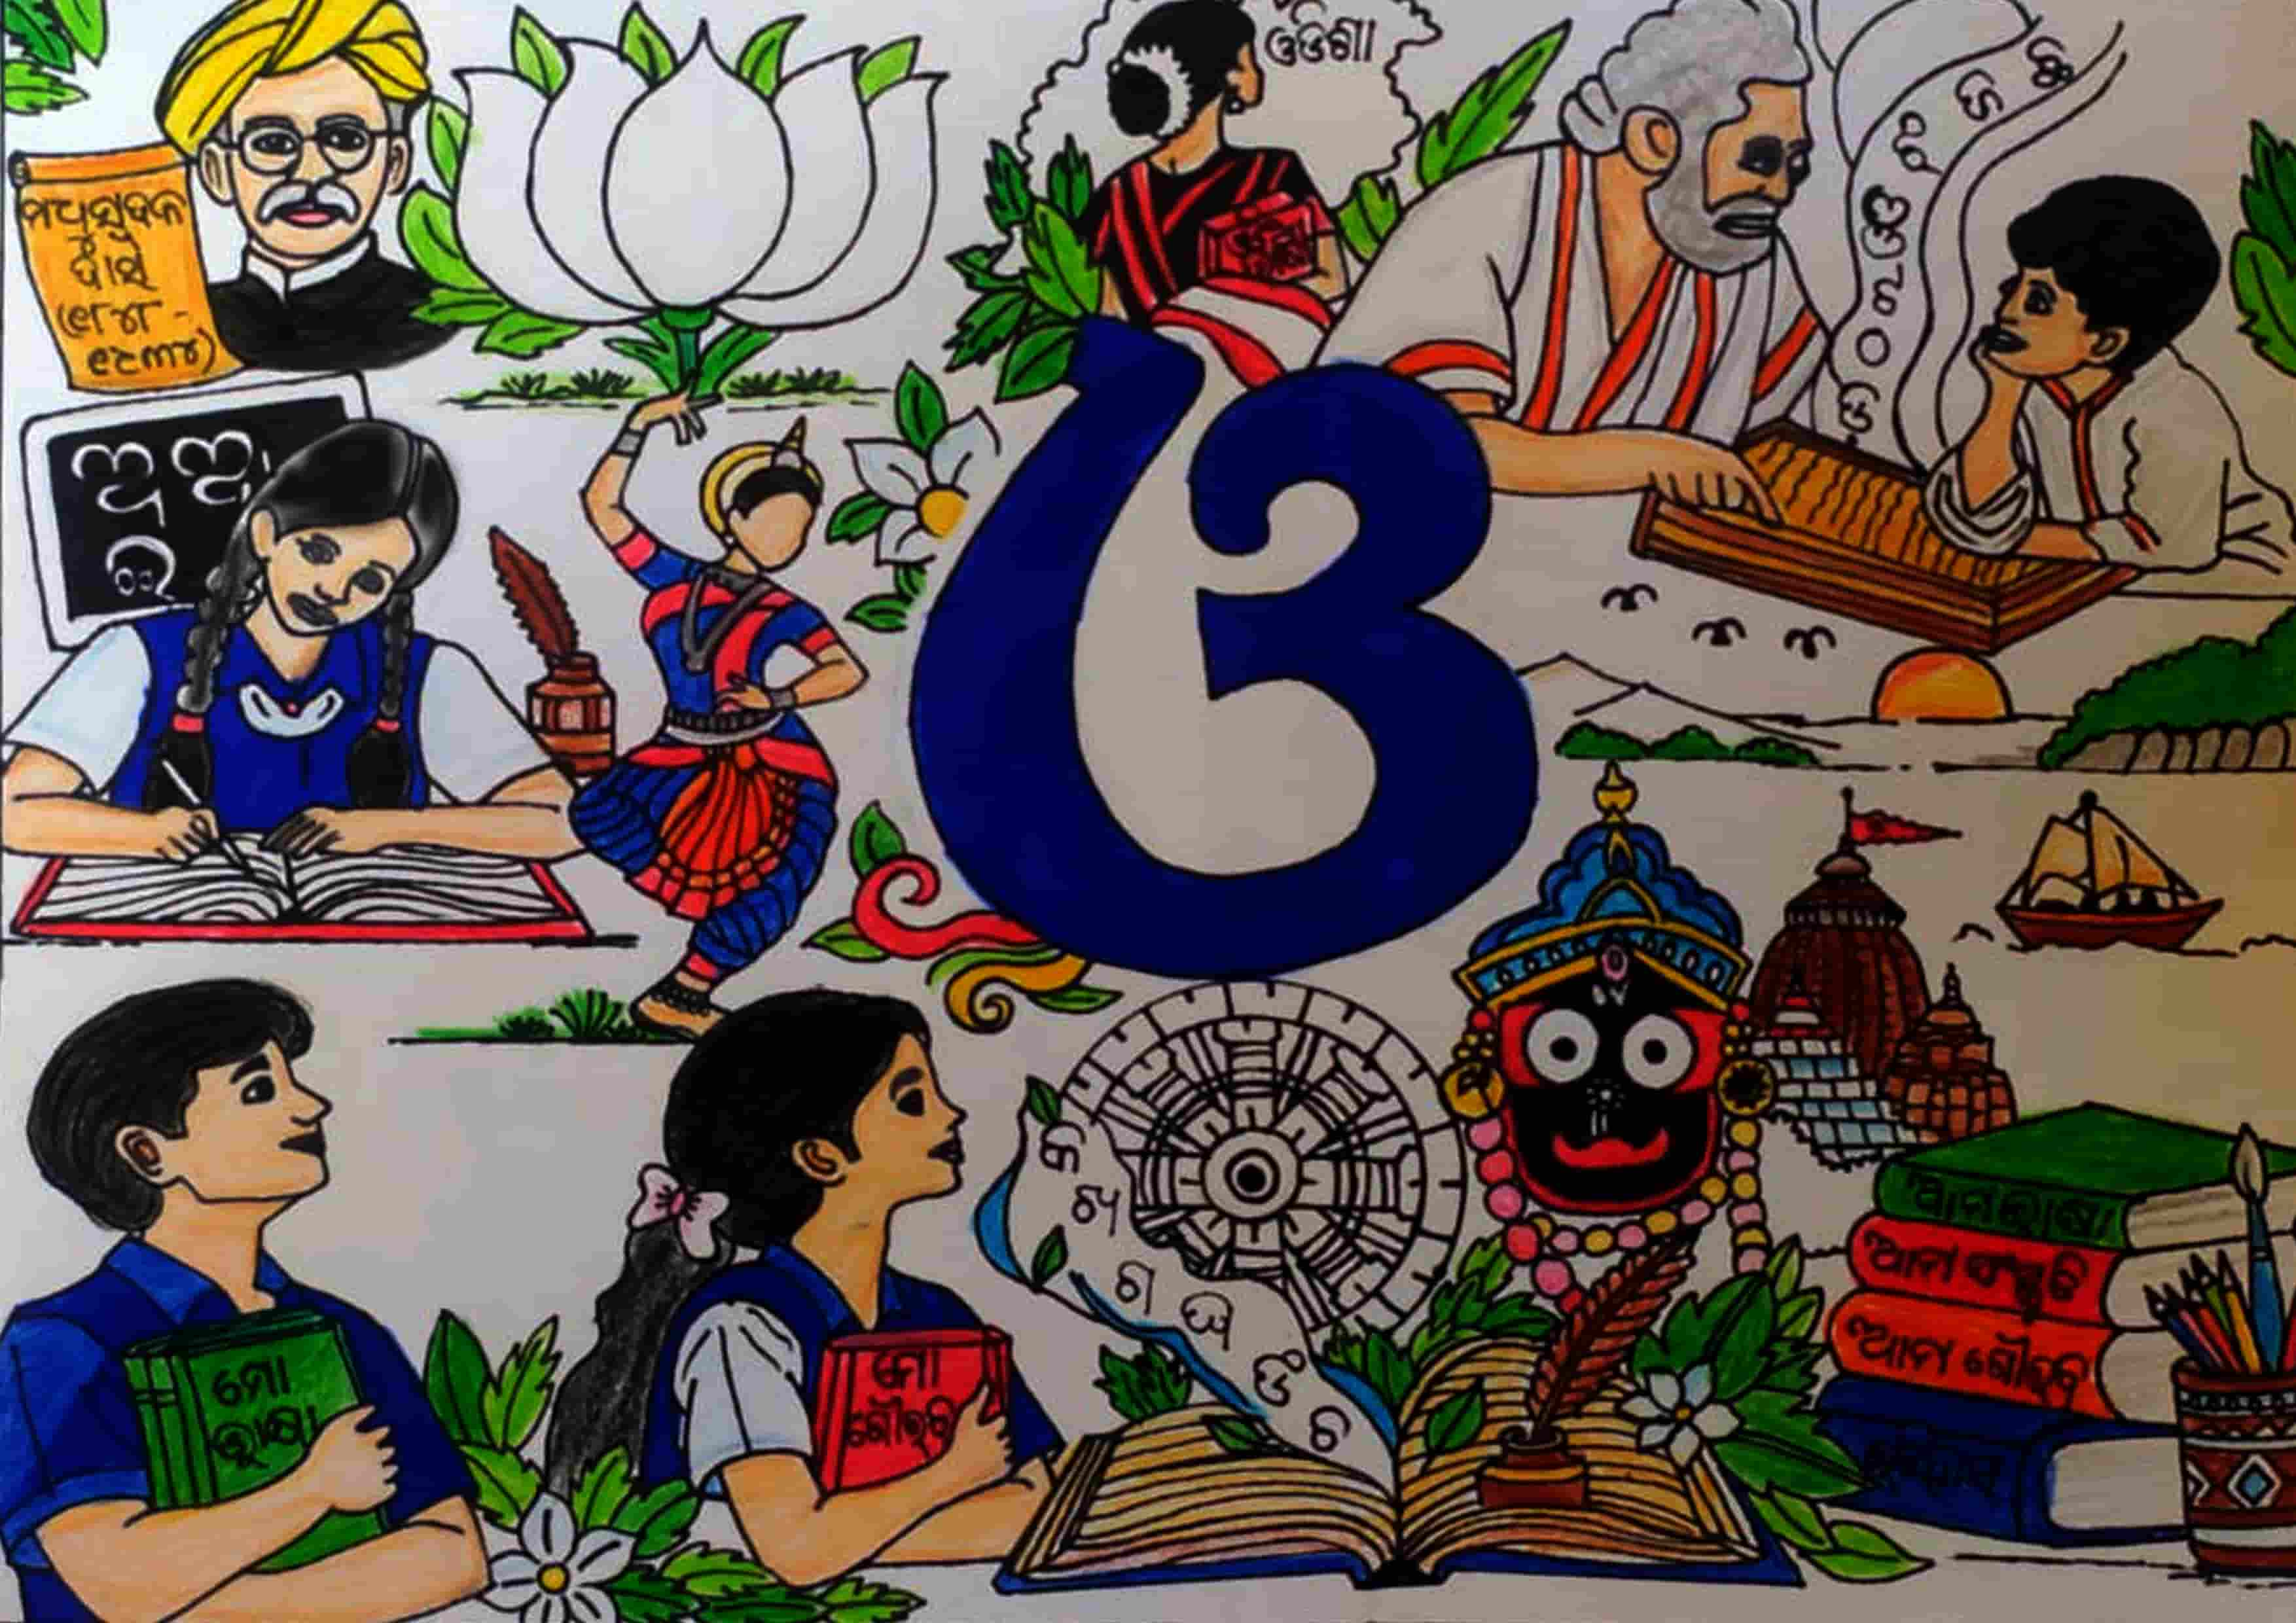
That is what I felt when I looked at this student’s My Language My Pride Odia painting. Nothing in it is random. A big blue Odia letter stands in the middle, and around it are students, teachers, books, a dancer, Lord Jagannath, a temple, a manuscript and a rising sun. Everything points to one idea: our language connects education, art, faith and history.
This is why “My Language, My Pride” is such a good school-art theme. In one sheet of paper, a student can bring together language, learning, heritage and Odisha’s identity. If you are working on an Odia language painting for school, a competition or an exhibition, this guide will help you plan it and finish it.
About the Painting Let me explain what this painting is saying, because a good drawing always has a message first and colours second.
The Core Symbol: The large blue Odia letter in the centre is the heart of the artwork. It appears to be the letter ଓ, which begins both “Odia” and “Odisha”. Everything else is arranged around it, like a family sitting around one lamp.
The Next Generation: The students are in the foreground. A girl writes in her notebook in front of a blackboard with Odia letters. A boy and a girl at the bottom hold books titled Mo Bhasha and Mo Gaurab, which mean “my language” and “my pride”. They are looking up with admiration. This tells us that the language lives on through the next generation.
Passing the Heritage: The elder in white with a palm-leaf manuscript is guiding a young boy who listens with his chin on his hand. Odia letters float up from them like a song rising in the air. This shows how language passes from teacher to student, just as it has for centuries. At the top left, a man in a yellow turban with a scroll carrying a name and years appears to honour a historical personality of Odisha.
Cultural Pride: The cultural symbols carry the pride. A classical dancer holds up a big white lotus. Lord Jagannath’s face and the Puri-style temple show spiritual identity. The Konark wheel stands for Odisha’s artistic heritage. A sunrise, hills, birds and a sailing boat give a sense of land and history. At the bottom right, a stack of books reads Aama Bhasha, Aama Sanskruti and Aama Gaurab, which tell us that language, culture and pride go together.
Materials Required You do not need anything expensive:
A drawing sheet (A3 is good for this much detail)
HB or 2B pencil
Eraser and sharpener
Ruler (to divide the sheet)
Black fineliner or sketch pen (fine and medium tips)
Colour pencils or oil pastels
Crayons for large areas, if you like
A soft cloth or tissue for blending
How to Draw the Painting – Step by Step Step 1 – Plan the composition Don’t start with faces. Start with the sheet. Lightly divide your paper into a few zones with a pencil: top left, top right, bottom left, bottom right, and a clear space in the middle. This painting does it well, using thin ground lines to separate the scenes while still letting them feel connected.
Decide the story of each zone before you draw. For example, learning on the left, culture and heritage at the bottom right, and a teacher-student scene at the top right.
Step 2 – Draw the main central idea Draw the big Odia letter first, right in the middle. Make it bold and round, with smooth curves. Everything else will be measured against it, so give it enough space. If you draw smaller things first, you may run out of room for the main subject.
Practise the letter on rough paper before drawing it on your final sheet.
Step 3 – Add students, teachers and learning elements Now place the people. Keep them in clear groups: the girl writing at her desk on the left, the two students holding books at the bottom, and the elder with the young listener on the right.
Draw the figures simply. Use ovals for heads, and sketch shoulders and arms as basic shapes before adding detail. Keep the body language meaningful: writing, listening, hugging a book, looking up with respect. These small gestures tell the story of learning.
Step 4 – Add Odia language elements Here, neatness matters. Write the words on books, boards and scrolls in light pencil first. Use titles like Mo Bhasha or Aama Sanskruti, or short words about language and pride. You can also let letters float out of an open book, as in this painting, so they look like they are flowing into the air.
Check your spelling with a teacher or parent before you ink it. A wrong letter in an Odia-language artwork is very noticeable.
Step 5 – Add Odisha’s cultural identity Choose symbols that you understand and can draw well. This painting uses Lord Jagannath, a Puri-style temple, the Konark wheel, a classical dancer and a lotus. You could also use other traditional art motifs, the sea and boats, or a folk pattern on a pen stand, as the artist has done in the bottom-right corner.
Be selective. Three or four well-drawn symbols look better than ten rushed ones. Place them where they support the main letter, not where they fight with it.
Step 6 – Add decorative elements Leaves, flowers and small curls are the glue of this painting. They fill the gaps between scenes and lead the eye from one part to another. Notice how the green leaves sit behind the lotus, beside the books and under the Jagannath section.
Use them only where there is a gap. If a space is already busy, leave it alone.
Step 7 – Outline the drawing Once the pencil work looks right, go over it with a black fineliner. Use a thinner line for faces, hands and small details, and a slightly bolder one for the main shapes such as the central letter, books and temple.
Don’t press too hard or use very thick lines everywhere, or the painting will look heavy. Let the ink dry fully before you erase pencil lines.
Step 8 – Start colouring Begin with the large areas, like the blue uniforms and the central letter. Then move to books, leaves and clothing. Keep the background mostly white or very light so the figures stand out.
Colour in one direction, with even pressure, to avoid patchy strokes. Take your time. Rushed colouring is the quickest way to spoil a good drawing.
Step 9 – Add details and shading Add a little darker tone where parts overlap, such as under the chin, beside folds of clothing, under books and where leaves meet. Add lighter spots on the lotus petals, flowers and the sun. This simple highlight and shadow work gives depth without needing advanced skills.
Layer a second colour lightly over the first to make it richer, such as a darker green on the shadow side of a leaf.
Step 10 – Final finishing Rub out any stray pencil marks. Go over any outline that has faded. Step back and look at the painting from a distance. Is there a colour imbalance? Is any corner too empty or too dark? Fix those small things now. This last check often separates a good drawing from a great one.
Colour Combination for “My Language My Pride – Odia” You don’t need a rulebook for colours, but these ideas work well:
Blue: The strongest colour here: school uniforms and the central letter. It feels calm, trustworthy and clearly connected to learning.
Green: Appears on leaves, a few books and the hills. It keeps the painting fresh and balances the blue.
Yellow and Orange: Bring warmth, as in the turban, the manuscript, the dancer’s skirt and the sunrise. Use them in small, deliberate doses.
Red: Highlights important details like the saree, a book cover and Lord Jagannath’s face. A little red goes a long way.
White: Your resting space. The lotus and the background are left mostly white, and that clean look makes the colours around them shine.
Black: Outlines everything and fills in dark details like hair and Lord Jagannath’s face.
Tip: The simple rule is to spread bright colours across the sheet instead of grouping them in one corner. If your painting starts to look crowded, leave a few areas white.
How to Make the Painting More Attractive Make the main subject the biggest: The central letter must be seen first.
Don’t fill every empty space: White space lets the eye rest.
Use dark outlines carefully: Bold lines for main shapes, thin lines for details.
Keep the background light: Coloured figures stand out against white.
Balance the colours: Repeat blues, greens and oranges across different corners.
Write Odia letters neatly: Use a ruler for guidelines if needed.
Add cultural details with purpose: Each symbol should say something about language, learning or heritage.
Keep faces and hands simple but clean: A simple, neat face is better than a complicated, messy one.
Leave breathing space around the centre: The main letter needs room to stand tall.
Link the scenes: Leaves, flowers and curls can join separate parts into one artwork.
Meaning Behind the Painting Why do we say “my language, my pride”? Because language is the first thing that connects a child to the world.
It is the language of our family, the first words our mothers and grandmothers spoke to us. It carries literature and history, the works of great writers and the memory of those who fought to protect the language. It holds songs, stories and folk traditions that never fit neatly into textbooks. And it ties us to our community, so that when we hear Odia spoken in a faraway city, we feel at home.
In this painting, all of that is quietly present: the elder teaching, the child listening, books about our language and culture, Lord Jagannath watching over everything, and the Konark wheel reminding us of the skill of Odisha’s artists. When we take pride in our language, we take pride in all of this.
Tips for School Drawing Competitions Understand the theme first: Ask yourself what “My Language My Pride” means to you before you draw anything.
Make the composition meaningful: Choose elements that connect to the theme, not just ones that look pretty.
Avoid copying too literally: Use this painting as inspiration. Change the symbols, the arrangement and the characters so your work feels like yours.
Keep the drawing clean: Neat lines and tidy lettering impress judges.
Use colours confidently: Don’t colour so lightly that the sheet looks pale.
Finish within the time limit: Plan your time, and don’t spend half of it on one small detail.
Keep time for final corrections: The last ten minutes should go to touch-ups and checking spellings.
Make the central message obvious: A judge should understand the idea in a few seconds.
Conclusion Painting your language is a special kind of homework. Every letter you shape and every symbol you place is a way of saying thank you to the people who kept Odia alive. So take your pencil, start with that big central letter, and let your painting tell your own story of pride.